Free WhatsApp Chatbot Builder | IDETA
What’s a Rich Text element?
The rich text element allows you to create and format headings, paragraphs, blockquotes, images, and video all in one place instead of having to add and format them individually. Just double-click and easily create content.
Static and dynamic content editing
A rich text element can be used with static or dynamic content. For static content, just drop it into any page and begin editing. For dynamic content, add a rich text field to any collection and then connect a rich text element to that field in the settings panel. Voila!
How to customize formatting for each rich text
Headings, paragraphs, blockquotes, figures, images, and figure captions can all be styled after a class is added to the rich text element using the "When inside of" nested selector system.
If you're looking for a Free WhatsApp Chatbot Builder, then this is the place for you. In this article, we'll show you how to make your own WhatsApp Chatbot in minutes with Ideta.
We'll also give you instructions on how to use the bot and what it's capable of doing. So if you want to learn how to build a free WhatsApp chatbot, keep reading!
In January 2018, WhatsApp released a special business app for small business owners. This WhatsApp app allows businesses to communicate with their customers by sending special notifications and messages through the standard client version of WhatsApp.
What is a WhatsApp Chatbot
What is a chatbot
A chatbot is a computer program that can interact with humans through messaging or voice. A messaging bot allows users to set up conversations, without having to talk with a human.
The ability of the system to send messages and store information in an organized database makes it possible for a user to ask questions about specific topics and get answers back from the bot automatically.
What is WhatsApp
WhatsApp, a messaging app that is used by over 1.5 billion people around the world. It allows users to send text messages, photos, videos and audio files to their friend.
These messages can be sent between two WhatsApp users for free via their phone number.
Why do you need a free WhatsApp Chatbot
Whatsapp has become the most popular messaging app in recent years, and for good reason. It’s simple to use and it works on almost every device you, and more importantly, your clients own.
With the help of chatbots, you can make people more familiar with your brand, a chatbot is an ideal way to have conversations and interact with customers in a natural manner and create connection with your prospects.
They are used more than ever before in customer service, sales, marketing and support. Chatbots are not just for entertainment anymore; they have become a tool that can be used to improve business processes by creating an interactive dialogue between humans and machines.
Chatbots are also a great way to automate tasks and boost efficiency. It's also much cheaper than hiring a human being, as chatbots can be trained with little effort.
By using a free WhatsApp chatbot, you could be able to manage all kinds of sales leads or answer questions from your clients. Moreover, WhatsApp is convenient for your users as they probably already have it on their phone.
How to create a WhatsApp Chatbot with a no-code Builder
You don't have to know how to code to create your chatbot. At Ideta we made it easy to build your bot in only few minutes. Once done, you just have to connect it to WhatsApp!
Follow this free WhatsApp chatbot builder tutorial
Define the purpose of your bot
When creating a bot, it is important to define the purpose of your bot. What will you use it for? Will it help your customer support? Will it serve as a fun way to answer repetitive questions? Will it have NLP?
You must also consider the limitations of WhatsApp itself. For exemple, WhatsApp can't handle quick answer bubble, it can only accept simple text!
For the purpose of this article, we are going to build a simple contest entry bot!
The bot will ask for the user name and email address, and will send the information to a Google Sheet.
Link Your Bubbles Together
Creating bubbles and linking them together with the Ideta free chatbot builder is very simple! Moreover, you can connect it to any app you want via an API.
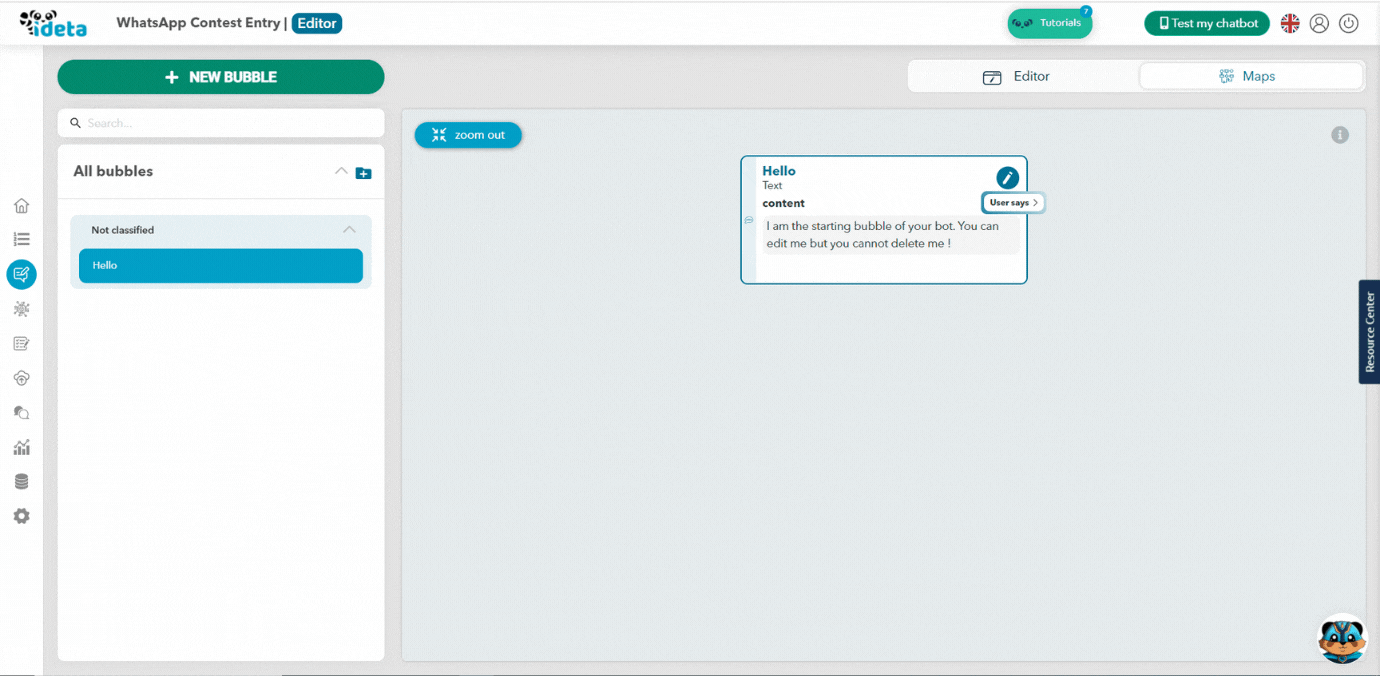
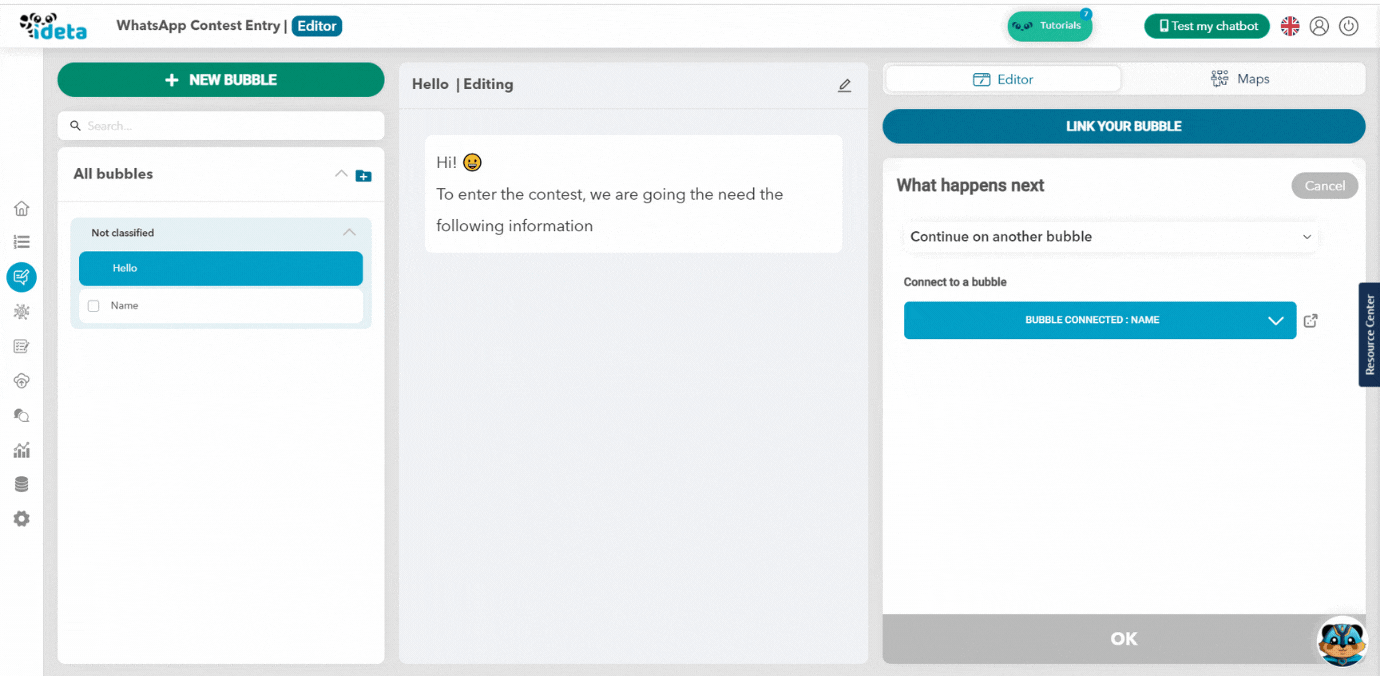
1. Edit the first bubble
We already created the first bubble for you, so you just have to edit it by clicking on the text!
Specify what the bot is for so that users are not confused. Since it’s a Contest Entry WhatsApp Bot, just say to the users :
“Hi! To enter the contest, we are going to need the following informations”, then validate.
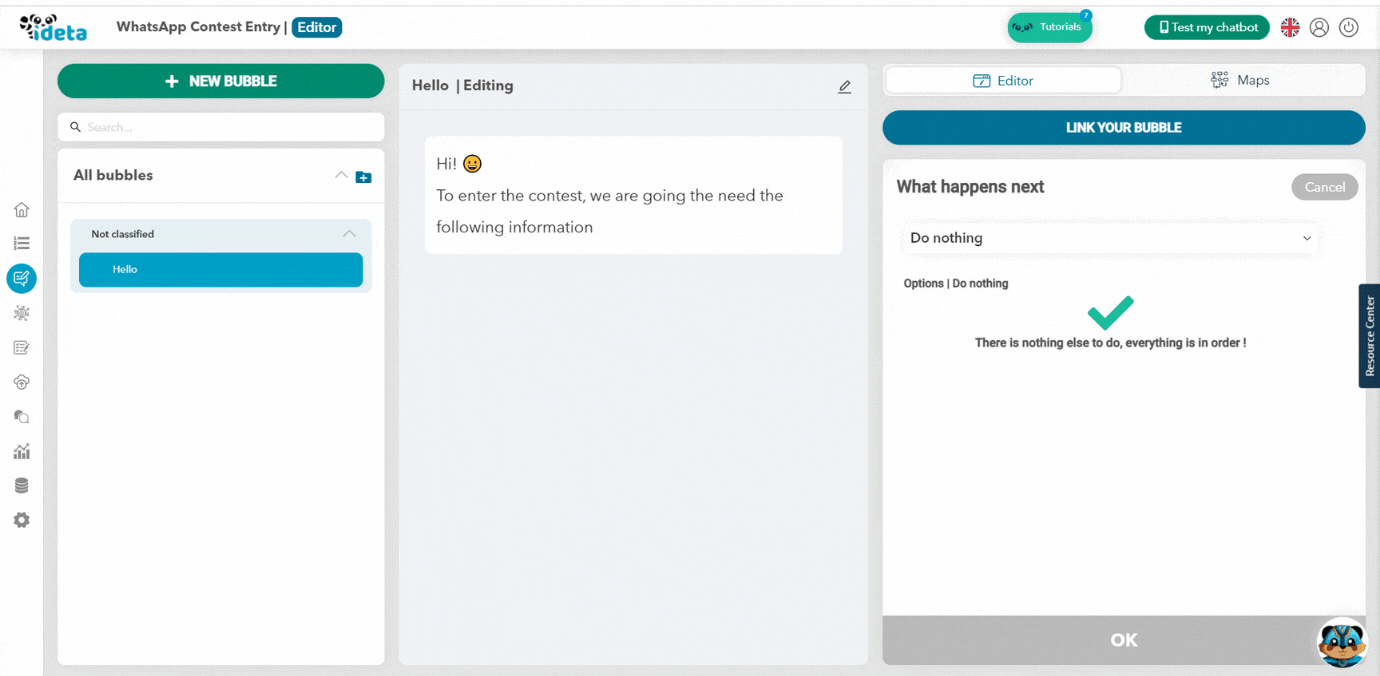
2. Connect your bubbles together
Then, create a new bubble that asks for the contestant’s name, and another one that asks for their email address.
We made it so the logical flow of the bot is easy to grasp. That’s why you can directly create a new bubble in your current one.
Click on “Link your bubble”, then choose the option to “Continue on another bubble”.
Since the bubble have yet to be created, click on the dropdown, then on “Add”.
The next steps are quite easy. You just have to name your bubble, we named it “name” because this bubble will ask for the contestant’s name. Then choose its type, in this case “text”.
Now, your first bubble is connected to the bubble “name” you just created!
3. Ask for the contestant’s name.
Now, you can go to the “name” bubble. Like in the previous steps, change the text of the bubble. Since we want the contestant name, we are going to tell the users to write their name.
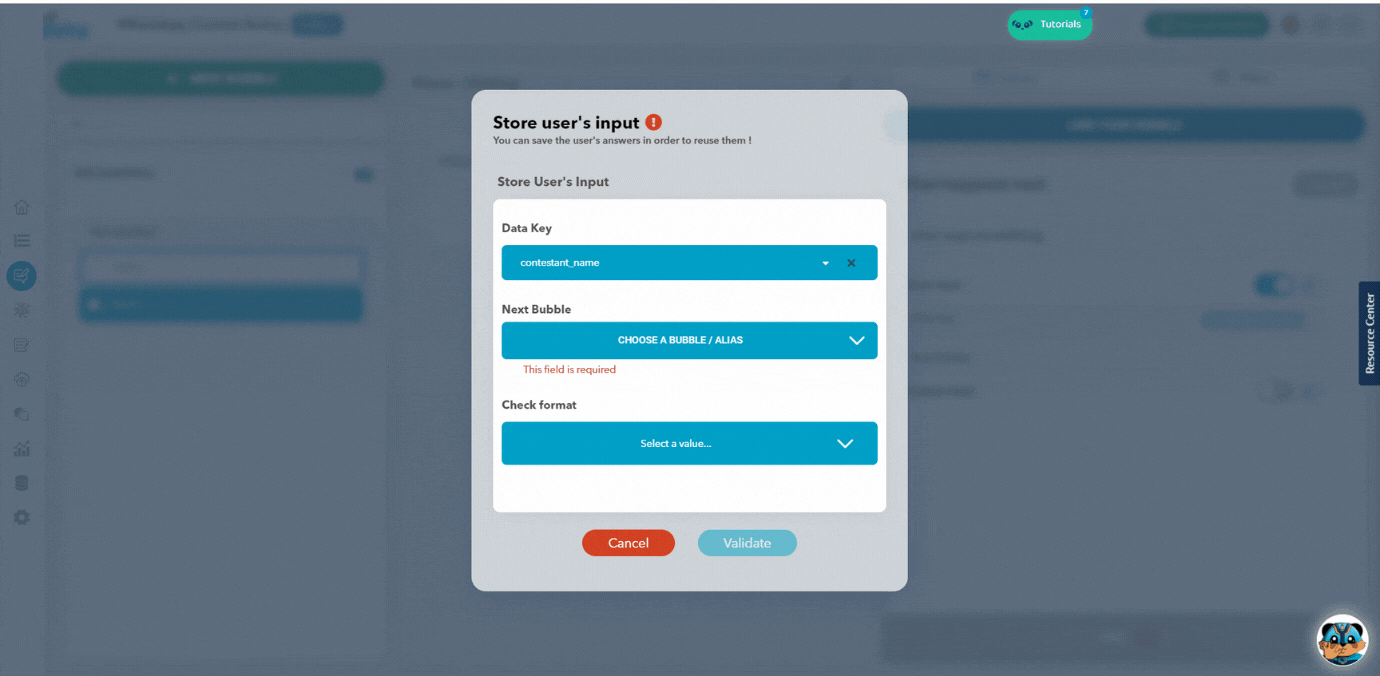
But, now we need to save this name somewhere, otherwise its useless. That’s what we are going to to right now!
Toggle the “Store input”. In Ideta WhatsApp Chatbot Builder you can create variable to store any input or information you need. So, follow the steps and create a new data key.
Give it a clear name, like “contestant_name”. You can see several type of data key, for now just choose “text”, since the input will be a text.
4. Ask for the contestant’s email address.
Then, same as Step 2, connect your bubble together! Create a new bubble of type text name “email”. We are going to ask for the contestant’s email address!
In your new “email” bubble, do the same as Step 3. Create a new data key that will store the contestant’s email. This time, after you created the data key, we are going to verify the format.
This will ensure that the input is indeed an email and not something else. So click on “Check format” dropdown and select “Email”.
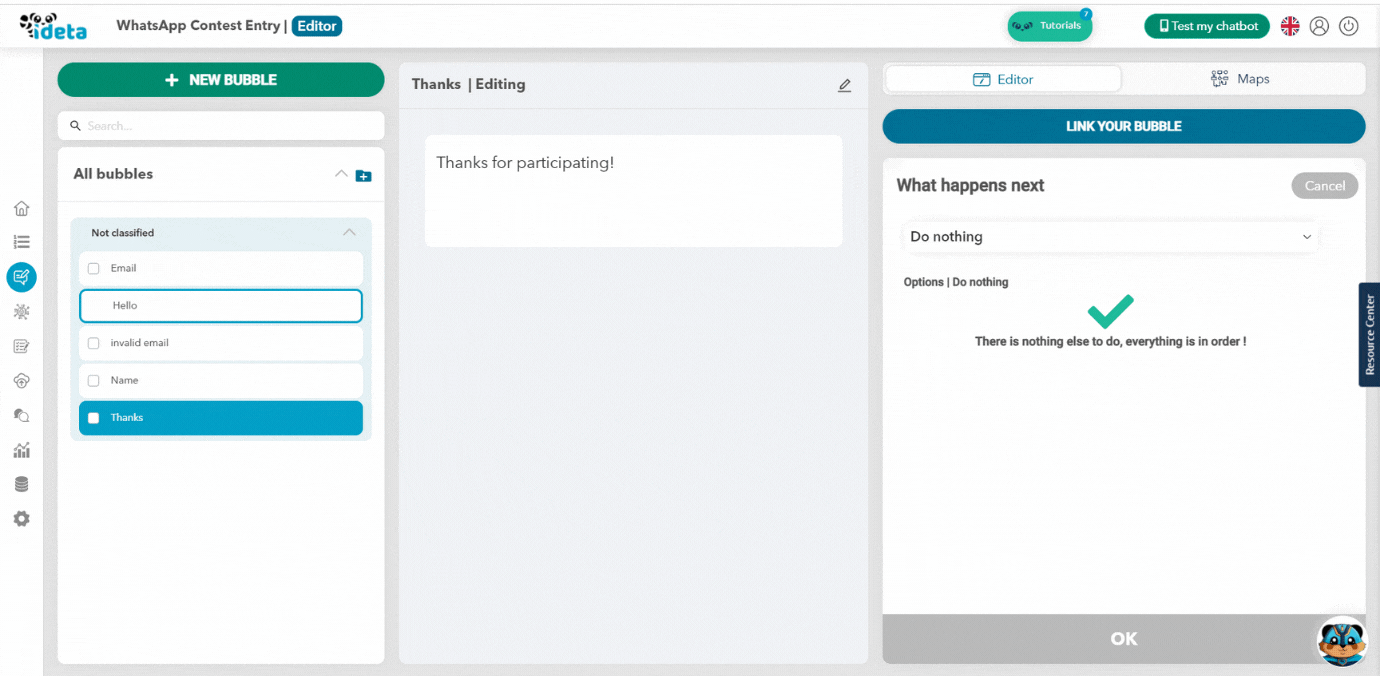
Once you do that, you will have to handle the situation where the input is not an email. So, just create a new bubble named “invalid email”, tell the user that you are expecting a real email address, and link this bubble back to the bubble “email” so this create a loop.
Once you do that, create a new bubble to thank the contestant. And your bot is now over! Congrats!
Connect your bot to Google Sheet
Now, you Contest WhatsApp Chatbot is pretty much useless if you can’t send the information to your CRM or to a Google Sheet to log the contest’s entries.
That’s why we are going to send the name and email address to a Google Sheet, and for that we are going to use Zapier!
What is Zapier
Zapier is a powerful tool that can connect two or more apps so you can automate repetitive tasks, and all that without a single line of code. When something, or an event happens in one app, Zapier transfers the information to another app and make it do a particular action.
For our purpose, we want Zapier to connect our WhatsApp Chatbot to Google Sheet. Then, when a contestant give its name and email address, we want Zapier to update our Google Sheet with those information.
Seems easy? So, lets go!
Connect to Zapier
Go to the “Settings” and click on “Integration”. Then deploy “Connect with Zapier”. A list of all our pre-made integration will open. Choose “Add new collected data from Ideta chatbots to Google Sheets row”
A new window is going to open. Just follow the steps!
Click on “Connect a new account”
You are going to need:
- Your Secret Key
- Your Bot ID
You will find these information in “Settings” and in the “General” tab!
Then, continue to follow the steps. You have to create your Google Sheet for the contest first.
Now that your bot is connected to Zapier, you should see the that the connection is “On”
Send the information to Google Sheet
Go back to your bot now. We are going to tell the bot to send the information to Zapier, then to Google Sheet when the conversation is done.
Create a new bubble of type “Zapier”.
This is a bubble we created for you so sending information is easy. You just have to specify which data you want to send. It works with a pair of “Variables” and “Value”.
So, the “variable” that we are going to call “Name”, is associated with data key that save the contestant’s name, and the variable called “Email” is associated with the data key that save the contestant’s email address.
Once you mapped out all of this, you have to send a test to Zapier, so it can know how you mapped out all of this.
So, go to the testing area and start a conversation with your bot. Fill out your name and email address, the Zapier bubble will get trigger and a first batch of information will be sent to Zapier.
Configure your Zap
Its almost over I promise!
Go back to Zapier and test the trigger. Load more data and you should see the data you just sent in the previous steps. Select it, and go to the next step, the Google Sheet configuration.
Now, you can set up your action correctly!
In the “Name” row of your Google Sheet, select the “Name” data key, and in the “Email Address” row, select the “email” data key.
Test your action, save everything and enable your Zap!
And here we go, your WhatsApp Chatbot is now connected to Google Sheet via Zapier.
Connect your free chatbot to WhatsApp
Now that your chatbot is done, you just need to connect it to WhatsApp and deploy it.
We are connecting the WhatsApp Chatbot via Twilio. So, first you have to create a Twilio Account and ask for a business phone number or connect your phone number to Twilio. After requesting the access, you should be able to follow the tutorial.
On Twilio, specify Ideta’s webhook URL:
“https://api.ideta.io/whatsapp/receive-message/YOUR_BOT_ID”
(Your Bot Id can be found in your Settings section)
Publish it and improve it
Then, once your WhatsApp Chatbot is connected to WhatsApp, you can finally publish it!
Go to the “Publish” section of your chatbot, choose the “WhatsApp” channel and fill up the requested data.
Save and publish. And you are done!
To go further: add NLP
You can make your chatbot more complex and human like by adding Natural Language Processing. This is a field of AI that analyse human input and respond accordingly.
This is a more complex configuration, but with our Free WhatsApp Chatbot Builder you can still add AI with Dialogflow in a couple of minutes.
Latest News